Learn Godot 4 by Making a 2D Platformer — Part 2: Player Setup & Movement Input
*You can find the links to the previous parts at the bottom of this tutorial.
WHAT YOU WILL LEARN IN THIS PART:
- How to create, run, and instance new scenes.
- How to add input actions, collisions, and physics to a node.
- How to manipulate a scene via scripts.
- How to add calculate velocity & movement.
We now have our project set up, so now we can go ahead and start creating the blocks that will eventually turn our skeleton project into a complete game. In this part, we will create a new Scene that will contain the nodes to make up our Player. Our Player is the actual character that we will be controlling when we play the game — and its scene will contain all the nodes and scripts that will allow us to see this character and control them so that we can run around and interact with the world.
In our Main scene, we can go ahead and delete that Sprite2D node that we added in the previous part — since we only added that node to demonstrate our texture filtering change. We will create a whole new scene for our Player, and then we will instantiate (or instance) it in our Main scene. Instancing allows us to replicate an object from a template so that we can modify them separately. In other words, we will have our Player separate from our Main scene, so we can treat it as a separate object. This way our Player is its own entity — one which is not dependent on our level (or Main) scene.
Go ahead and delete the Sprite2D node from your Main scene so that we are left with this:

Then, let’s create a new scene. Let’s create a new scene. You can do so by clicking on the plus icon next to Main(*), which will create a new empty scene.

In the Scene Dock, add a new root node. We need this root node to be a CharacterBody2D node, which is a specialized 2D physics body node for characters that can be moved via scripts. We need this node to provide our player character with physics so that it can move around.

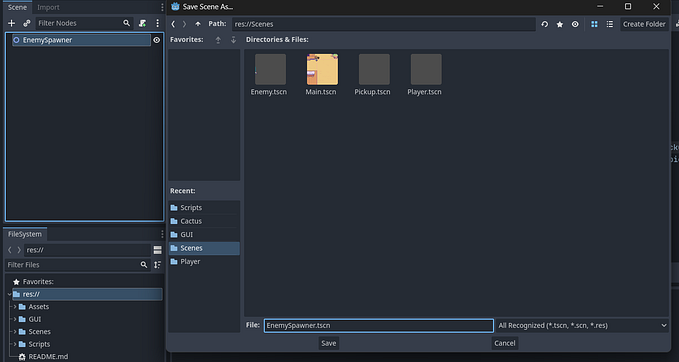
Double-click your newly added CharacterBody2D node to rename it to “Player”, then save the scene underneath your Scenes folder.


You will see a yellow triangle pop up next to your Player root node. If you hover over it, it will tell you that the node has no shape. The shape that it is referring to is a collision shape, which is the shape that will surround our character so that it can collide and interact with other items in the level.

Let’s clear this warning by adding a CollisionShape2D node to our Player scene.

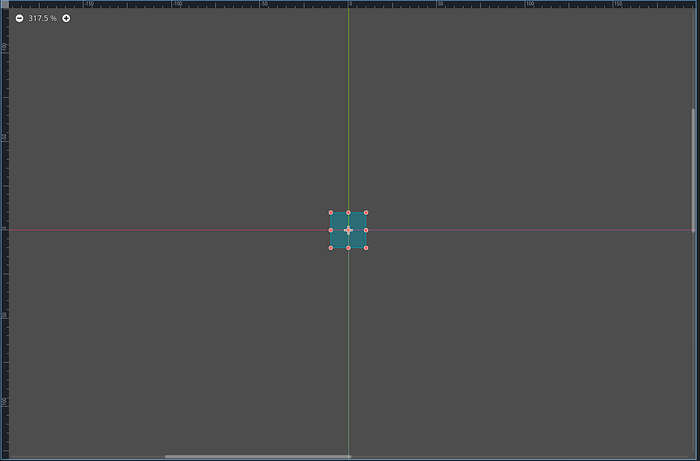
This will return another warning because even though we’ve added a collision node, we still have not assigned it a collision shape. We need to set the shape property to configure the shape. We can do this by clicking on our CollisionShape2D node and assigning it a shape in its Shape property in the Inspector panel. Let’s add a new RectangleShape2D shape.

I’m choosing a RectangleShape2D shape because that is the shape of my character — we can also always change this shape later on to meet our needs. The type of shape that you choose for your object will depend on what you want them to accomplish (from where they need to collide), as well as their body shape. So, a circular character might have a CircleShape2D, and so on. Press F to focus on your node. You will see that your shape has been added.
Next, we need to add a sprite to our Player scene so that we can visually see our node. If you want to have an item that does not move around or that has no animations, you can add a Sprite2D node to serve as this sprite. In our case, we want our Player to move around and do this with Animations. Therefore we will add an AnimatedSprite2D node instead. AnimatedSprite2D is similar to the Sprite2D node, except it carries multiple textures as animation frames.
Make sure that you add this node with your root (Player) node selected and not your CollisionShape2D node selected. We want the AnimatedSprite2D node to be a child of the root node and not the collision shape!
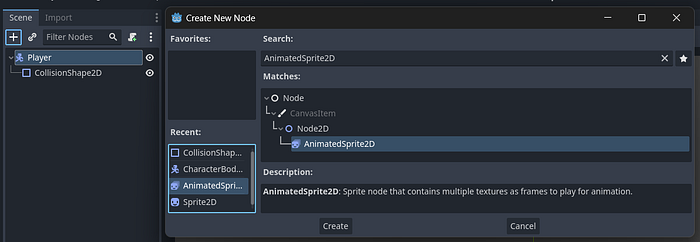
This node will also return a warning since it requires a SpriteFrames resource. This resource allows you to import image files (or a folder containing said files) to provide the animation frames for the sprite. We can add a new SpriteFrames resource in the Inspector panel via the Sprite Frames property. Click on the <empty> option next to your Sprite Frames property and select “New SpriteFrames”.


If you click on this newly added resource, it will open up the Animations panel in our editor below. It is here where we can configure our SpriteFrames resource. The configurations include the ability to add new animations, delete animations, play animations, or edit animations. The default animation can be deleted or renamed. We will add all of our player’s animations in the next part so that we can explore this node in more detail. For now, let’s just assign a sprite to our default animation by clicking the “Add Frames from Sprite Sheet” option.


A window will pop up so that we can select the Sprite Sheet. This spritesheet will contain the animation frames that will make up a complete animation. We want to add a basic idle animation, so head into “res://Assets/Kings and Pigs/Sprites/01-King Human/” and select the “Idle (78x58).png” sheet.

From here, we need to crop out our animations. We need to change our Horizontal and Vertical values to the number of animations frames we can count. Horizontally (column-wise), we count 11 kings, and vertically (row-wise), we count 1 king.
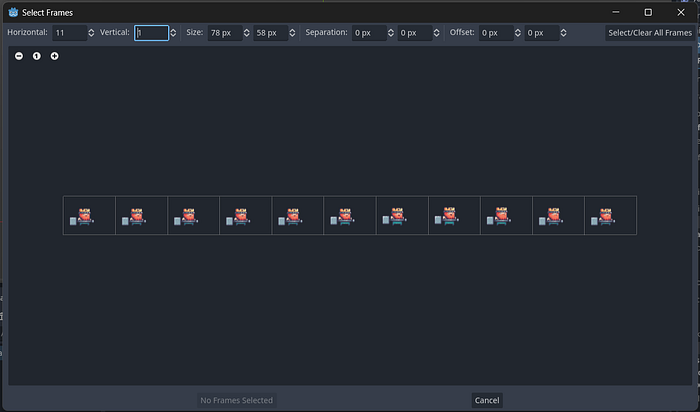
Let’s select each frame (select them in order) for our idle animation.

Later on, you might notice that there is an odd gap when our player changes sides (turns left or right) because our Sprite has such a large gap next to it — i.e., the Sprite Frame is not centered. Since this is not a game that we will publish and the assets we acquired were free, we will not care too much about this, but if you are making a game that you want to publish make sure that the spritesheet that you make or obtain have sprites that are centered when you crop them out. If this is a dealbreaker for you, then I recommend you go on an adventure to find other assets on Itch.io!


Okay, let’s rename our “default” animation to idle. We also want to turn off looping since we do not want our idle animation to loop continuously. 5 FPS is also too slow for my taste, so I’m going to up my FPS to 10. You can play around with the FPS value to see what you like — just keep in consideration how fast you want your animation to play.

Now that we have our player set up, let’s add a new script to our Scene so that we can add the code to move our player around. Select your root node and click on the scroll icon next to it to add a new Script. Rename this script to “Player” and save it underneath your Scripts folder.
You can add a script to any node, and you will be able to identify the node that the script is attached to via the ‘extends Node’ code at the top of your script. We have a line that says “extends CharacterBody2D:”. This line indicates that this script inherits from a class called CharacterBody2D.

We want our Player to move in four directions: left, right, up, and down. When we press our left and right inputs, our player should move left or right. When we press our up input to climb a ladder, our player should move up. We will only move down when the player is falling, so we will add velocity to our player instead of an input for this. We also need to add an input for our player to jump when they press the jump key.
Let’s start with our inputs for our left, right, and up movements. Godot already has built-in input actions, but we will add a few more inputs to these actions. Input actions are mapped to the physical controls, such as our keyboard keys, joysticks, buttons, etc. These actions are then assigned to functions that will move our character around the game.
To add input actions, we go to Project Settings > Input Map. Show the built-in actions by enabling the “Show Built-In Actions” toggle.

We want to add extra inputs to our ui_left, ui_right, and ui_up inputs. The ui_ stands for “user input”, and you don’t have to stick to this naming convention for your future input actions, but for our project, we will. You can edit these inputs by pressing on the pencil icon next to them. You can also assign other keys to this input by clicking on the plus icon next to it.
Let’s assign the “W” key on our keyboard to our ui_up input. Now we can move up with both our “W” and “⇧” keys.

Let’s assign the “A” key on our keyboard to our ui_left input. Now we can move left with both our “A” and “⇦” keys.

Let’s assign the “D” key on our keyboard to our ui_right input. Now we can move right with both our “D” and “⇨” keys.

Finally, let’s add a new input called ui_jump and assign your “Space” key to it. Now we can jump when we press our Space key.

In our code, we can now go ahead and add our movement functions. For now, we will only move our player left and right. We will add the jumping and climbing functionality in the next part when we add our movement animations. To move our player around, we need to make use of our _physics_process function. This function processes our CharacterBody2D node’s physics and movement at each frame, and therefore our player can move at each frame.
We will first have to define our Player’s speed and gravity variables since we want our player to move at ‘x’ speed horizontally and fall at an ‘x’ force of gravity vertically. We will export these variables so that they can be edited from the Godot editor.
### Player.gd

extends CharacterBody2D

#player movement variables
@export var speed = 100
@export var gravity = 200
You can now change these variable values for your player in the Inspector panel.

In Godot, we can capture input via the Input singleton — which can be called in any function and by any class — or the input() function — which will be called whenever an input event occurs. If you want to capture an input once (such as when you jump) you will capture the input in the input() function, but if you want to capture the input as long as the input occurs (such as when you’re sprinting) you will use the Input singleton. I made a Mural board that gives examples of the methods that can be called by both the Input Singleton and function, which you can view here.

Now, we need to create a function that will handle our horizontal movement (left or right) for our player. In this function, we will calculate the horizontal vector (1, -1)values of our “ui_left” and “ui_right” inputs. If the right key is pressed via our “Input.get_action_strength(“ui_right”)” method, our function will return 1. If the left key is pressed via the “Input.get_action_strength(“ui_left”)”, the function will return 1. By subtracting the left value from the right value, we get -1 if moving left, 1 if moving right, or 0 if neither or both are pressed.


We will then take these returned values (0, 1, or -1) and multiply them by the character’s speed to set the horizontal velocity. This makes the character move left or right based on player input.
### Player.gd

extends CharacterBody2D

#player movement variables
@export var speed = 100
@export var gravity = 200

func horizontal_movement():
    # if keys are pressed it will return 1 for ui_right, -1 for ui_left, and 0 for neither
    var horizontal_input = Input.get_action_strength("ui_right") - Input.get_action_strength("ui_left")
    # horizontal velocity which moves player left or right based on input
    velocity.x = horizontal_input * speed
Now, we can call this function in our _physics_process function, which will calculate these movement values each second (delta). The delta parameter represents the time passed in seconds since the last physics frame and is used for framerate-independent movement. Before we calculate the player’s horizontal movement, we need to calculate the player’s vertical movement. We want our y velocity to pull our player down at our gravity’s force. Then, we will call our horizontal_movement() function to calculate our horizontal movement.
We will apply these movements using the move_and_slide method. This method moves the body based on its x and y velocity. If the body collides with another, it will slide along the other body (by default only on the floor) rather than stop immediately. If we used the move_and_collide method, our player would not have gravity enabled since that method does not require velocity.
### Player.gd

extends CharacterBody2D

#player movement variables
@export var speed = 100
@export var gravity = 200

#movement and physics
func _physics_process(delta):
    # vertical movement velocity (down)
    velocity.y += gravity * delta
    # horizontal movement processing (left, right)
    horizontal_movement()
    #applies movement
    move_and_slide()

func horizontal_movement():
    # if keys are pressed it will return 1 for ui_right, -1 for ui_left, and 0 for neither
    var horizontal_input = Input.get_action_strength("ui_right") -  Input.get_action_strength("ui_left")
    # horizontal velocity which moves player left or right based on input
    velocity.x = horizontal_input * speed
Your code should now look like this.
Let’s instance our Player scene in our Main scene so that we can test out our movement. In your Main scene, click on the chain icon to instance a new scene, which is our Player scene. This will add our Player scene as a child to our Main scene — whilst still treating our Player scene as an independent object.

Zoom out and move your Player node inside of the blue frame of your Main scene. This blue border represents your game screen.

You can move your Player with the move tool selected.

If you now run your scene using the F5 key or by pressing the play button above your Inspector Panel, you will see that you can move your player, but it is falling until it disappears off of our screen. It falls because it does not have any floor to stop it yet — which we will add in the next few parts to come.

Congratulations on setting up your player and adding some movement to it! In the next part, we will add our animations to our player character so that it can start coming to life. Now would be a good time to save your project and make a backup of your project so that you can revert to this part if any game-breaking errors occur. Go back and revise what you’ve learned before you continue with the series, and once you’re ready, I’ll see you in the next part!
Next Part to the Tutorial Series
The tutorial series has 24 chapters. I’ll be posting all of the chapters in sectional daily parts over the next couple of weeks. You can find the updated list of the tutorial links for all 24 parts of this series on my GitBook. If you don’t see a link added to a part yet, then that means that it hasn’t been posted yet. Also, if there are any future updates to the series, my GitBook would be the place where you can keep up-to-date with everything!

Support the Series & Gain Early Access!
If you like this series and would like to support me, you could donate any amount to my KoFi shop or you could purchase the offline PDF that has the entire series in one on-the-go booklet!
The booklet gives you lifelong access to the full, offline version of the “Learn Godot 4 by Making a 2D Platformer” PDF booklet. This is a 451-page document that contains all the tutorials of this series in a sequenced format, plus you get dedicated help from me if you ever get stuck or need advice. This means you don’t have to wait for me to release the next part of the tutorial series on Dev.to or Medium. You can just move on and continue the tutorial at your own pace — anytime and anywhere!
This book will be updated continuously to fix newly discovered bugs, or to fix compatibility issues with newer versions of Godot 4.

